
How to Enter Data Into a Table
The Navigator is a graphical interface tool that is good for novice users and seeing an overview of the database. It is used to create, update, and delete objects, such as projects, users, tables, and roles. The Navigator displays information about the database, such as tables created, who owns them, and what roles the user has been granted.
To open the Navigator click on:
Start – Programs – Windows 95 – Oracle8 Navigator.
The database, which you will create later on in this module, contains information about two soccer teams. In particular it holds data about the coach, players, and the equipment used.
The following Entity Relationship (ER) diagram depicts the database.
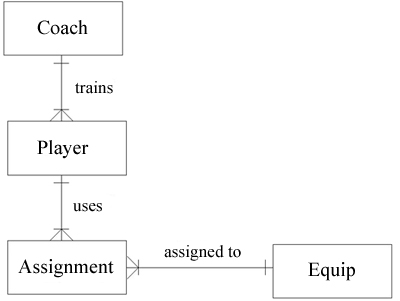
The following relationships exist among the tables:
A project can be thought of as a folder for storing related objects. For example, you can store a user's objects together in a project.
There are a couple of different ways to create a new project once you are in the Navigator.
Either way you choose, the Create Project window will display. The Navigator will ask you where you want to save the project. It is a good idea to store the project in the following directory: c:\orawin95\Nav80. In the File Name box call the project Soccer. Then click the Save button. An empty project window will display. Click the ‘x’ to close this window because you do not need it open. In the next section you will use the Navigator to create objects, such as a user and tables, within the project.
Back to Top
Start the database if you haven't already done so.
To create a user right click on the Soccer project icon, then click New – User. The New Users Properties window
will display. The General tab is where you will specify the user’s name and password.
In this case, make both the name and password SAM. Enter the password twice in order
to confirm it. Then click on the Roles/Privilege tab. This is where you will
grant roles and privileges to the new user. First, click on the
Roles radio button. You will see that the user already has
the role CONNECT granted to him. The CONNECT role allows the user to log on to the database; query other users’ tables
that the user has been permitted to access; and insert, update, and delete rows in tables belonging to other users that the
user has been permitted to access. You also want to grant the role DBA
to the new user. Click on the DBA role in the Remaining right hand window
and click the ‘<’ button. Click the okay button to create the new user.
Now check that the user has been created by looking in the Navigator window. In the right pane of the Navigator window, you should see an icon of a person named SAM.
Back to Top
It is time to create the tables, which make up the database. You will need to create four tables: Coach, Player, Assignment, and Equip.
Begin by creating the Coach table.
To create a table, right click on the Soccer project folder and click New – Table.
You will prompted to create the table using the table wizard or manually. I find it easier to use the table wizard. This section will explain how to use the table wizard to create a new table.
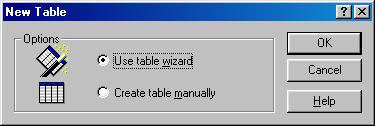
After you click okay, a series of screens will display, which will guide you through creating the table.
The first screen, Page 1 of 7, will ask you what name you want the new table to be called and the owner of the table. In the first box type Coach. In the second box select SAM.
Click the Next button to continue.
The next screen, Page 2 of 7, is where you will enter information about each column in the Coach table. Click on the tab labeled Coach to get the information needed to fill in the fields in Page 2 of 7.
For the screen, Page 2 of 7, you will only need the data in the first four columns of the coach table. (This screen is where you will enter the column name, data type, the size or length of the data and scale.) Start by entering the column name, Coach_id, in the Column Name box. Then click on the drop down box to find Number (the data type) in the Column Type box. Then enter the length of Coach_id clicking on the down arrow until ‘2’ displays. Finally, enter the value for the scale of the column.
Now, click the New key to enter in the data for the next column, Name.Continue this process until you have finished entering the data for all of the column names.
You can use the arrow buttons to move back and
forth between the columns where you have already entered the data. The following explains each button:
When you have finished entering the data for the last column name, click the Next key. The Back key will take you back to the previous screen.
This screen asks you whether the column value can be null and/or unique.
The default for this screen is to start entering data for the last column, in this case Games_Lost. Therefore, click the << button to take you back to the first column, in this case Coach_id. Refer to the "Null?" and "Unique?" columns in the Coach table to enter in the data for this screen.
For example, for the Coach_id column, click the No radio button to answer the question "Can the column value be null?" and the Yes radio button to answer the question "Does the column value have to be unique?" Then click the ">" button to go to the next column.
Continue this process for each column in the Coach table. After you have entered the data for the last column, click Next to continue.
After you click the Next button, a screen requesting your password will display. Enter the password for SAM, which is SAM. Then click the okay button.
This screen asks you to specify the foreign key for the table if there is one. However, for the Coach table, there is not a foreign key. If there is a foreign key for the table, I find it easier to skip this screen and enter the foreign key information after you have created the table. I will show you how to specify a foreign key later in this section. Click the Next button to continue.
In this screen you will specify the primary key for the table. The primary key for the Coach table is Coach_id. Click the radio button labeled "Yes, I want to create a primary key." Then click in the column, Primary Key, in the first row, Coach_id, and a ‘1’ should appear. Click the Next button to continue.
In this screen you can reorder the way the columns will appear in the table by selecting the column and either clicking the up or down button. In addition, you can delete a column by selecting it and clicking the delete button. Click the Next button to continue.
This screen asks you if you want to enter the data now or later. I find it easier to enter the data later by clicking on the "No, I don’t want to enter the data now" button. Click the Finish button to complete the creation of the table.
It is a good idea to check to make sure the table was created properly. To check the table, right click on the Coach table and click Properties.
In the Coach properties window, click the Design tab. You can examine the table by scrolling back and forth to make sure the table specifications were entered properly. If you find a typo, you can correct it in this screen.
To create the other three tables go through this entire process again. Click here to go back to the directions for creating a table.
After you have created all of the tables, you will need to specify the foreign keys for the Player table and the Assignment table.
To specify the foreign key for the Player table:
1. Right click on the Player table (in the right pane of the Navigator
window).
2. Select properties.
3. Click the Design tab.
4. In the Coach_id row and Foreign key column, type
SAM.Coach(Coach_id)
(The syntax is OWNER.TABLE(COLUMN NAME)
5. Click okay.
To specify the foreign key for the Assignment table:
1. Right click on the Assignment table (in the right pane of the
Navigator window).
2. Select properties.
3. Click the Design tab.
4. In the Player_No row and Foreign key column, type
SAM.Player(Player_No)
5. In the Equip_id row and Foreign key column, type
SAM.Equip(Equip_id)
6. Click okay.
You can use the Navigator to enter the data into the tables that you previously created. Open up the Navigator if you haven’t already done so. Open up the table that you wish to enter data into by double clicking on it. This will open up a blank window with the column headings at the top.
To enter the data into the table, click on the appropriate field and type the data. When you have finished entering data into the first row, right click and a shortcut menu will display. There are several options in this menu from which you will choose.
Listed below are the five tables that make up the Soccer database. Enter the data in each table into the appropriate table.
|
Coach_id |
Name |
City |
Games_Won |
Games_Lost |
|
01 |
Sue |
Kennesaw |
15 |
10 |
|
02 |
Matt |
Marietta |
11 |
14 |
|
Player_No |
Name |
Begin_Date |
Goals_Hit |
Coach_id |
|
10 |
Mark |
15-JAN-1998 |
2 |
02 |
|
11 |
Lane |
01-FEB-1998 |
3 |
02 |
|
12 |
Julie |
01-MAY-1997 |
8 |
01 |
|
13 |
Mary |
15-JUL-1997 |
4 |
01 |
|
14 |
Lisa |
01-AUG-1998 |
7 |
01 |
|
Player_No |
Equip_id |
|
10 |
1001 |
|
11 |
1001 |
|
13 |
1002 |
|
14 |
1003 |
|
Equip_id |
Equip_Name |
No_In_Stock |
|
1001 |
Ball |
25 |
|
1002 |
Jersey |
20 |
|
1003 |
ShinGuard |
25 |